QuickStart
For this quickstart, you will locally run the components of Hippo, create a hello world application, and then run it on Hippo. This quickstart is broken into two parts:
- Install and configure the Hippo PaaS system (Hippo, Wagi, Bindle). This is typically done once for a team.
- Develop a Hippo application (Yo-wasm, Hippofactory).
If you already have a Hippo PaaS available, you can skip the first part. However, you will need the URLs for the Hippo server and the Bindle server.
Prerequisites
- Node.js installed with npm.
- WASI compatible programming language installed, either AssemblyScript, C, Rust, or Swift. This is required for Part 2.
- PowerShell v6+, if using Windows.
- Git installed. This is a temporary development dependency until Hippo and WAGI are publishing releases.
- .NET 5. This is temporary development dependency until Hippo is publishing releases.
Concepts
For this quickstart, the main concepts that you will use include:
-
A binary containing your application which has been compiled to byte code understood by WebAssembly runtimes. Normally your application may be compiled so that it runs natively on an operating system and architecture, such as linux/amd64. Applications must be compiled for wasm+WASI in order to be runnable by Hippo.
Not familiar with WebAssembly? Take a quick tour of WebAssembly in a Hurry to get up to speed.
-
A packaging service, where a versioned package (a bindle) contains your WebAssembly module and supporting files.
-
The platform that serves WebAssembly modules.
-
A web service that accepts HTTP connections and passes the requests to WebAssembly modules.
Part 1: Setting Up the Hippo PaaS
In this part, we will focus on the following three steps:
Run a Bindle Server
First, set up a local installation of Bindle Server. This is where you will publish revisions of your application.
-
Download the latest release of bindle for your operating system. Extract the
bindleandbindle-serverbinaries and move them to a directory that is in yourPATH.linux
curl -sL -o /tmp/bindle-v0.4.1-linux-amd64.tar.gz https://bindle.blob.core.windows.net/releases/bindle-v0.3.1-linux-amd64.tar.gz
mkdir -p /tmp/bindle-v0.4.1-linux-amd64
tar -C /tmp/bindle-v0.4.1-linux-amd64 -xzf /tmp/bindle-v0.3.1-linux-amd64.tar.gz
mv /tmp/bindle-v0.4.1-linux-amd64/bindle* /usr/local/bin/
macos
curl -sL -o /tmp/bindle-v0.4.1-macos-amd64.tar.gz https://bindle.blob.core.windows.net/releases/bindle-v0.4.1-macos-amd64.tar.gz
mkdir -p /tmp/bindle-v0.4.1-macos-amd64
tar -C /tmp/bindle-v0.4.1-macos-amd64 -xzf /tmp/bindle-v0.4.1-macos-amd64.tar.gz
mv /tmp/bindle-v0.4.1-macos-amd64/bindle* /usr/local/bin/
powershell
(New-Object System.Net.WebClient).DownloadFile("https://bindle.blob.core.windows.net/releases/bindle-v0.4.1-windows-amd64.tar.gz", "$env:TEMP\bindle-v0.4.1-windows-amd64.tar.gz")
mkdir -force -path $env:TEMP\bindle-v0.4.1-windows-amd64
tar -C $env:TEMP\bindle-v0.4.1-windows-amd64 -xzf $env:TEMP\bindle-v0.4.1-windows-amd64.tar.gz
mkdir -force -path $env:USERPROFILE\bin
mv -force $env:TEMP\bindle-v0.4.1-windows-amd64\bindle* $env:USERPROFILE\bin\
$env:PATH+=";$env:USERPROFILE\bin"
In order to persist the changes to your Windows PATH environment variable, create a PowerShell Profile if you do not have one, and then add
$env:PATH+=";$env:USERPROFILE\bin"to it. -
Run the Bindle server in the background, using the default configuration which listens on localhost port 8080.
bindle-server & -
Set the BINDLE_URL environment variable, used by the remainder of this quickstart for bindle, hippofactory and hippo server.
posix
export BINDLE_URL="http://localhost:8080/v1"powershell
$env:BINDLE_URL="http://localhost:8080/v1" -
Verify that your Bindle server is available by listing all registered bindles:
bindle searchYou should see an empty set of results without any errors.
query = ""
strict = true
offset = 0
limit = 50
total = 0
more = false
yanked = false
invoices = []
Now that you have a Bindle server up and running, the next step is to run a local Hippo server.
Install WAGI
-
Download the latest release of bindle for your operating system. Extract the
wagibinary and move it to a directory that is in yourPATH.linux
curl -sL -o wagi-v0.2.0-linux-amd64.tar.gz https://github.com/deislabs/wagi/releases/download/v0.2.0/wagi-v0.2.0-linux-amd64.tar.gz
mkdir -p /tmp/wagi-v0.2.0-linux-amd64
tar -C /tmp/wagi-v0.2.0-linux-amd64 -xzf /tmp/wagi-v0.2.0-linux-amd64.tar.gz
mv /tmp/wagi-v0.2.0-linux-amd64/wagi /usr/local/bin/
macos
curl -sL -o wagi-v0.2.0-linux-amd64.tar.gz https://github.com/deislabs/wagi/releases/download/v0.2.0/wagi-v0.2.0-macos-amd64.tar.gz
mkdir -p /tmp/wagi-v0.2.0-macos-amd64
tar -C /tmp/wagi-v0.2.0-macos-amd64 -xzf /tmp/wagi-v0.2.0-macos-amd64.tar.gz
mv /tmp/wagi-v0.2.0-macos-amd64/wagi /usr/local/bin/
powershell
(New-Object System.Net.WebClient).DownloadFile("https://github.com/deislabs/wagi/releases/download/v0.2.0/wagi-v0.2.0-windows-amd64.tar.gz", "$env:TEMP\wagi-v0.2.0-windows-amd64.tar.gz")
mkdir -force -path $env:TEMP\wagi-v0.2.0-windows-amd64
tar -C $env:TEMP\wagi-v0.2.0-windows-amd64 -xzf $env:TEMP\wagi-v0.2.0-windows-amd64.tar.gz
mkdir -force -path $env:USERPROFILE\bin
mv -force $env:TEMP\wagi-v0.2.0-windows-amd64\wagi $env:USERPROFILE\bin\
$env:PATH+=";$env:USERPROFILE\bin"
You can test that the installation was successful by running wagi --help.
You do not need to run Wagi as a server. Hippo will manage that.
Run a Hippo Server
Instructions pending published releases of Hippo. For now you must run Hippo from source.
-
Clone the Hippo repository to your local development environment.
git clone https://github.com/deislabs/hippo.git -
Restore Hippo’s dependencies.
dotnet restore cd Hippo npm run build -
Run Hippo:
dotnet run -
Open your web browser to https://localhost:5001 and accept the self-signed certificate to view the Hippo control panel.
-
Click login from the left hand navigation and log in with the username
adminand the passwordPassw0rd!.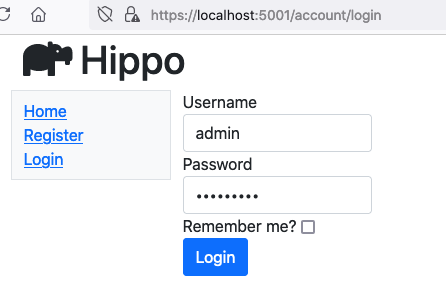
-
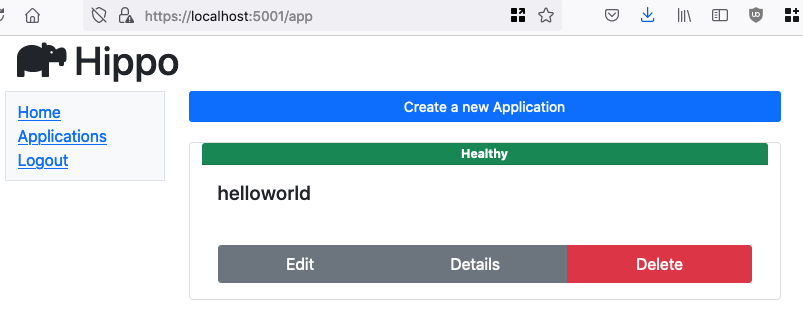
Once you are logged in, you should be redirected to the Applications page, displaying a preseeded helloworld application.
Troubleshooting
-
npm run build fails with error gyp: No Xcode or CLT version detected
This is a problem with MacOS Catalina and higher. Follow the xcode troubleshooting steps from this article to address it.
-
The Hippo control panel CSS isn’t rendering properly
Repeat the
npm run buildcommand in the Hippo directory in the hippo repository. Check the logs for any errors (such as the one above in the previous troubleshooting step) and address them.
Part 2: Writing a Hippo Application
At this point, you should have a Bindle and Hippo running, and Wagi installed.
To successfully complete Part 2, you will need to have the URLs for Bindle and Hippo ready
at hand.
If you followed the steps above, Hippo’s URL will be http://localhost:5001 and Bindle’s URL will be http://localhost:8080/v1.
Creating a new Hippo application has three steps:
Install yo-wasm
Instructions pending the v0.4 release of yo-wasm. For now you must install yo-wasm from source.
We have created a tool, [yo-wasm], that scaffolds a new application in either AssemblyScript, C, Rust, or Swift that is ready to be compiles to WebAssembly, and pushed to Hippo.
-
Open a new terminal window so that you can continue the quickstart while the Hippo server runs in the other session.
-
Install [Yeoman] if it is not already installed.
npm install -g yo -
Clone the yo-wasm repository.
git clone https://github.com/deislabs/yo-wasm.git -
Install the yo-wasm module from source.
cd yo-wasm
npm install
npm run compile
npm link
Create a WebAssembly application
Use yo-wasm to generate your application. In this example, we will create a Rust application, though C, Swift, and AssemblyScript are also supported.
-
Define the following environment variables. These are used by yo-wasm, and hippofactory.
posix
export HIPPO_URL=HIPPO_URL=https://localhost:5001
export BINDLE_URL=http://localhost:8080/v1/
export HIPPO_USERNAME=admin
export HIPPO_PASSWORD=Passw0rd!
powershell
$env:HIPPO_URL="HIPPO_URL=https://localhost:5001" $env:BINDLE_URL="http://localhost:8080/v1/" $env:HIPPO_USERNAME="admin" $env:HIPPO_PASSWORD="Passw0rd!" -
Create a new directory for your application.
mkdir quickstart cd quickstart -
Disable strict SSL certificate checking because our Hippo server is using a self-signed certificate.
posix
export GLOBAL_AGENT_FORCE_GLOBAL_AGENT=falsepowershell
$env:GLOBAL_AGENT_FORCE_GLOBAL_AGENT=false -
Run
yo wasmand answer the interactive questions to generate your application.- Accept the default name.
? What is the name of the WASM module? (quickstart) - Select “Web service or application using WAGI”.
? What type of application is the module? (Use arrow keys) Console or batch job ❯ Web service or application using WAGI - Change the author name to your username, without using any spaces.
? What is the name of the author? (Your Name) myname - Select “Rust” for the programming language.
? What programming language will you write the module in? (Use arrow keys) AssemblyScript C ❯ Rust Swift - Select “Hippo” for the publish destination.
? Where do you plan to publish the module? (Use arrow keys) ❯ Azure Container Registry Hippo I don't want to publish the module - Use “https://localhost:5001” for the Hippo Service URL.
This defaults to the HIPPO_URL environment variable which should be set.
? What is the URL of your Hippo service? (https://localhost:5001) - Use “http://localhost:8080/v1/” for the Bindle Server URL.
This defaults to the BINDLE_SERVER_URL environment variable should should be set.
? What is the URL of your Hippo's Bindle server? (http://localhost:8080/v1/) - Select the default Y (yes) to register the application with Hippo.
? Would you like to create a new Hippo application for this project? (Y/n) - Accept teh default storage ID for the application.
? What storage ID (bindle name) would you like for your Hippo app? (myname/quickstart) - Accept the default Hippo user name “admin”.
This defaults to the HIPPO_USERNAME environment variable which should be set.
? Enter your Hippo user name (will become app owner) (admin) - Accept the default Hippo password, which is hidden and not displayed.
This defaults to the HIPPO_PASSWORD environment variable which should be set.
? Enter your Hippo password [hidden]
- Accept the default name.
-
Compile and run your application locally to try it out. It should print “Hello, world!”.
cargo run -
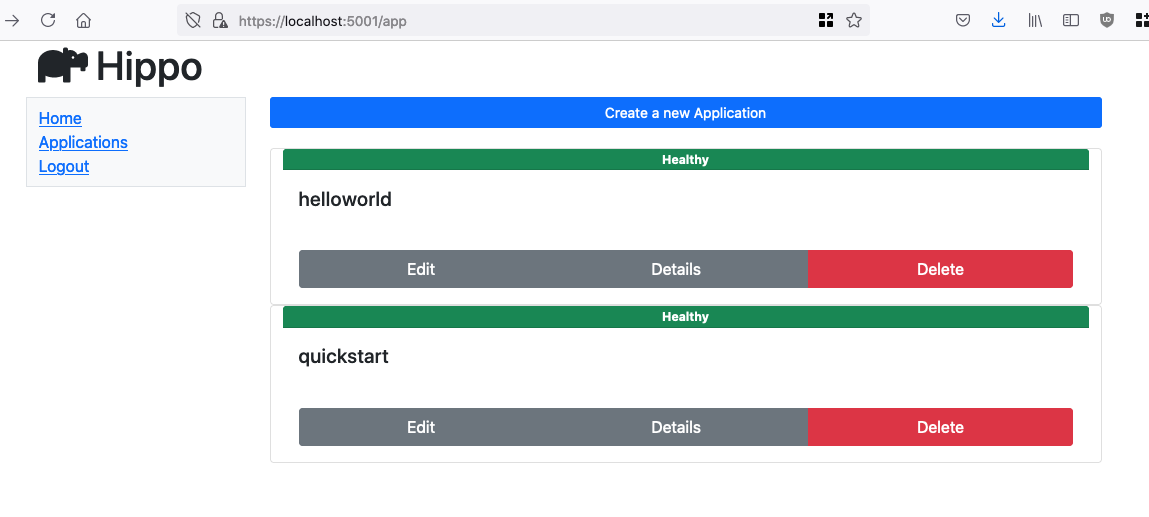
Open your web browser to the Hippo control panel at https://localhost:5001 and then navigate to Applications. You should see a second application named quickstart in the list of registered applications.
Troubleshooting
-
The yo wasm command fails with “connect ECONNREFUSED 1127.0.0.1:80”
Setting up your Hippo application...
Setup failed! You will need to create the Hippo app manually.
The error was: Error: connect ECONNREFUSED 127.0.0.1:80
This error indicates that either your Bindle Server URL or Hippo Service URL were invalid URLs and could not be parsed. Verify that you have
BINDLE_URLandHIPPO_URLset correctly, and then re-runyo wasm. -
The yo wasm command fails with “unable to verify the first certificate”
Setting up your Hippo application...
Setup failed! You will need to create the Hippo app manually.
The error was: Error: unable to verify the first certificate
If you see the above message from yo-wasm, you need to disable strict SSL certificate checking by setting the
GLOBAL_AGENT_FORCE_GLOBAL_AGENTenvironment variable to false, and hen re-runyo wasm.
Publish the application to Hippo
At this point, your application is only registered with Hippo, but it is not yet being served. You need to first compile the application, package it into a bindle, and then push it to a Bindle server. Then Hippo will note the new version and deploy it.
-
Compile your application to WebAssembly with WASI support.
cargo build --target wasm32-wasi --release -
yo-wasm generated a file named HIPPOFACTS, which defines how to package your application into a bindle, and includes information for the WAGI runtime on how to serve it.
[bindle]
name = "myname/quickstart"
version = "0.1.0"
authors = ["myname"]

[[handler]]
route = "/"
name = "target/wasm32-wasi/release/quickstart.wasm"
The quickstart application defines a single endpoint that is handled by the WebAssembly module. Learn more about how to Configure an application with HIPPOFACTS.
-
Use hippofactory to package your application into a bindle and push it to your local Bindle server. This command relies upon HIPPO_URL, HIPPO_USERNAME, and HIPPO_PASSWORD.
hippofactory -k -v production HIPPOFACTSYou should see the following output:
pushed: myname/quickstart/0.1.0 -
In the original terminal window where you started the Hippo server, look at the logs, and look for the line that says where you newly deployed application is running.
INFO wagi] => Starting server on 127.0.0.1:32768 -
Open your web browser and navigate to http://127.0.0.1:32768. You should see “Hello, world!” printed on the page.
Troubleshooting
-
hippofactory fails with the error “No such file or directory”
This can occur when you try to publish before the application is compiled to wasm32-wasi. Check that all files referenced by your HIPPOFACTS file, such as the handler for
target/wasm32-wasi/release/quickstart.wasm, exits.
Summary
This quickstart has walked through two separate stages:
- Set up the Hippo PaaS, which includes Hippo, Bindle, and Wagi
- Write a Hippo app
The Hippo PaaS offers a team of developers a platform through which they can develop and deploy WebAssembly microservices or web applications. Typically, teams will share a Hippo PaaS or will use a hosted version. When it comes to writing applications, the development process looks like this:
- Scaffold an application for WebAssembly in a number of languages with the yo wasm.
- Test and iterate locally on your application using standard tools, targeting your development machine’s architecture, not wasm. Essentially, develop your application just as you do today.
- Register your application with a Hippo server when you are ready to share it.
- Publish new versions of your application to a Bindle server, triggering Hippo deployments automatically.
You focus on your application, and Hippo takes care of hosting it.
